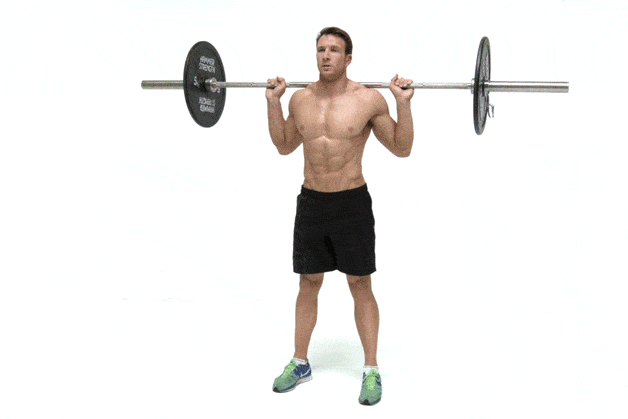
Squat
High bar squat:
 (sourced from Men’sHealth)
The squat mainly targets the quadriceps, hip muscles, glutes, and targets to a lesser extent the lower back, hamstrings, calves and abdominals.
Technique
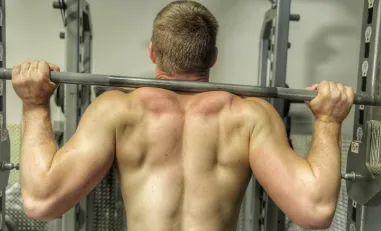
- ‘Building the shelf’:
- Grip as closely as your shoulder mobility allows for. A narrower grip results in a sturdier shelf, but can result in form breakdown at the bottom of the squat if you’re lacking in mobility.
- Grip style doesn’t matter. Just use either a standard overhand grip or false grip
- Place bar on your upper traps
- Pinch your shoulders together.
- Push your elbows backwards.
- Keep tight and hold all that upper body tension the entire time.
- (First breath) Breathe air into your diaphragm and brace your core.
 (sourced from Squat University)
- Grip as closely as your shoulder mobility allows for. A narrower grip results in a sturdier shelf, but can result in form breakdown at the bottom of the squat if you’re lacking in mobility.
- Pop the bar off the rack by driving hips forward.
- 3-step walkout: take one big step back, another to roughly meet the other foot, another to get into the final squat stance. Be quick and energy-efficient, but don’t rush.
- Prefer a shoulder-width stance or slightly wider. Point your toes slightly outwards.
- Pre-descent: be patient and don’t rush into descent after the walkout.
- (Second breath) Let go of the first breath just a bit* (don’t deflate!), then breathe air into your diaphragm and brace your core as if you’re about to take a punch to the gut.
- Look out to the horizon.
- Descent:
- (Optional) Push your hips back very slightly, just before descent. This is called hip-first and is an alternative to creasing the hip and knees simultaneously to start the descent. Never focus on bending on the knee first.
- ‘Open your groin’ and drop down in a controlled manner (taking ~1 second), going as low as you can. At least get the hip crease below the knee.
- Focus on opening your groin instead of pushing your knees out*. You’ll sit backwards and will feel less stress on the knees.
- Keep your elbows pushed back slightly, not directly below the bar.
- Keep the weight distributed equally across your feet throughout the whole descent and ascent.
- Keep your chest outwards. A cue is to point your chest up.
- Ascent:
- Push the world away. Push your back against the barbell — this helps so much. Just think: chest up and out as you explode out of the hole.
- Never let your hips shoot up.
- Never let your knees cave in. Always track your knees in the same direction as your toes.
- Keep knees pointed in the same direction as toes are pointed throughout both descent and ascent.
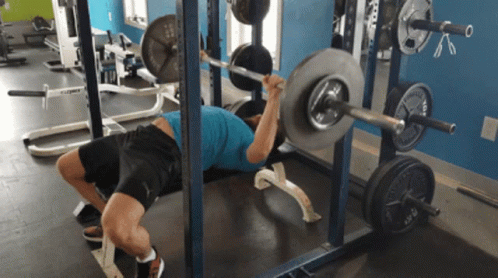
Bench Press
 (source)
- Setup:
- Arch your lower back. This positions your chest higher, resulting in a shorter distance that the bar has to travel. It keeps your shoulders safe.
- Cue: pull your shoulders back and down.
- Your 3 points of contact (glutes, upper back and feet) should never lift off the bench/ground.
- Position your feet wherever it’s the case that supplying leg drive does not cause your butt to lift off the bench.
- Prefer a grip width such that when the bar is at your chest, your forearms are perpendicular to the barbell.
- The bar should be directly above your eyes before you unrack.
- The rack should be at a height such that the bar is 2” up from the rack at full elbow extension.
- Unrack:
- Pull the barbell with your lats towards the starting position (until your arms are perpendicular to the ground). This side-to-side motion should not involve pushing the bar upwards by much.
- Do not ‘pop’ the bar up to unrack it. This causes you to lose your upper body tightness.
- Descent:
- The barbell should tap (not bounce) around your lower pec or lower sternum.
- At the bottom, your forearms should be close to vertical from a side view. This is where your barbell should meet your body.
- At the bottom, your elbows should form a 45° angle with your torso. This is sometimes referred to as ‘tucking’ your elbow.
- The bar path should curve very slightly outwards, following a diagonal descent to your chest.
- One cue is to imagine bending the barbell, or snapping the barbell in two with your hands. This is meant to engage your lats more.
- The barbell should tap (not bounce) around your lower pec or lower sternum.
- Push:
- Drive up and back.
- Leg drive: push with your quads up the bench, not towards the ceiling.
If you have trouble with locking out beyond midway, pause your bench press reps*.
Deadlift
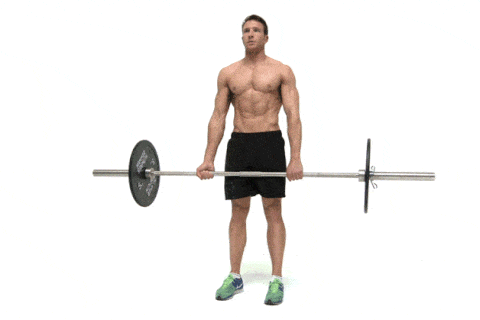 (
(The deadlift mainly targets hamstrings, glutes, back and lats, and to a lesser extent forearms, traps, abdominals.
Technique
Lift barefoot or in deadlift shoes. Don’t lift in running shoes.
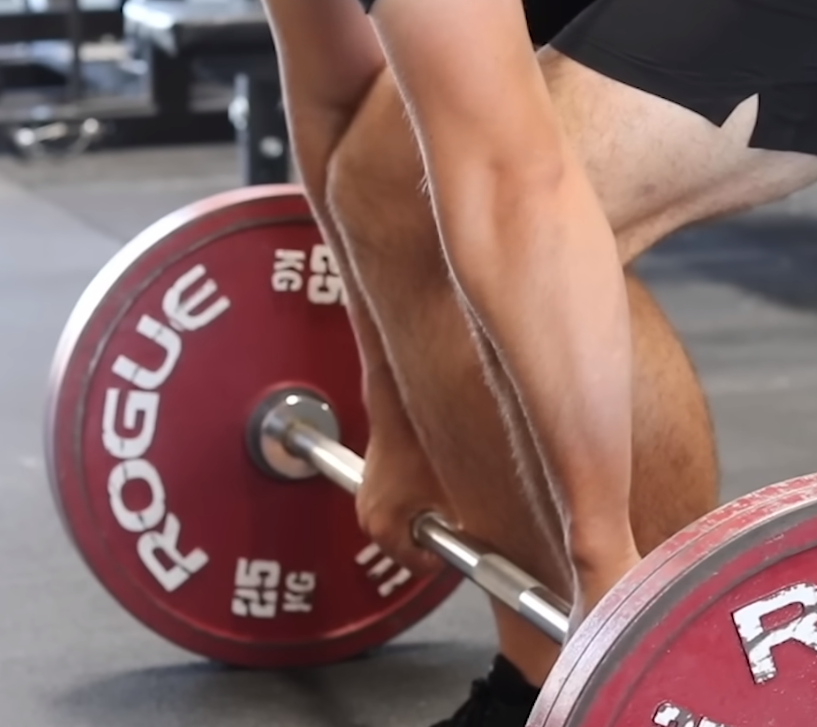
- Beginning stance:
- Put the middle of your feet directly under the barbell at ⇐ shoulder-width with toes slightly pointed out.
- A narrow stance prevents knees from caving in and lets you grip so that your arms are closer to being perpendicular to the ground.
- Grab the barbell without moving your shins and without moving the barbell.
- Your grip width should be roughly where your arms naturally hang.
- Choose one of these grip styles: double overhand standard, mixed grip, double hook grip.
- Push knees forward until shins meet the barbell and without moving the barbell.
- Breathe deeply into your diaphragm and brace your core as if you were about to punched in the gut.
- Push chest through, push shoulders down, engage your lats (by thinking about reaching your hands as far down as possible).
- (Optional) Push your knees gently into the crease of your elbows. Your knees should be aligned with your forearms.
- Look slightly downwards.
- Your shoulders should be slightly past the barbell. Your shoulder blades (scapula) should be directly up from the barbell.
- Your arms should be close to vertical, ie. perpendicular to the ground.
- You should feel extremely tight just before you begin the lift.
- Weight should be distributed evenly across your feet.
- Your lower back should never curve outwards.
- Put the middle of your feet directly under the barbell at ⇐ shoulder-width with toes slightly pointed out.
- Lift:
- Right before you lift, pull the slack out of the barbell. You’ll hear a click. Never jerk the barbell.
- Just stand up, or explode up, or push the world away. Drag the barbell up along your shins, knees and thighs the whole way through.
- Once the barbell is above knees, squeeze your glutes hard and thrust your hips forward to lock out.
- Lowering:
- Lower the barbell in a straight line down, not around your knees. Do this by first pushing your hips back and letting the barbell slide off your thighs.
- Repeating: using deadstop over touch & go.
- Stop the barbell entirely on the ground. Don’t take advantage of the bounce to start the next rep.
Weakness off the floor
- Lack of tension throughout the body, which results in inefficient transfer of upward force onto the barbell.
- Inability to push with the legs from the starting position. Your quads and lats should be stronger — consider doing high-bar squats and barbell rows (and its variants such as pendlay rows and kroc rows).
Variants:
- Deficit deadlifts with an elevation of 1.5-3cm. You can just stand on a single plate.
- Low pause deadlift where you pause the lift for 3 counts when the bar is just 1-2 inches off the floor.
- Stay over the bar. You should not be leaning back or deviating from the normal deadlift form. The only difference should be the introduction of a pause.
- The barbell must be in contact with your shins.
- Halting deadlift where you do a rep up to the knees, drop it, then follow up with a full rep.
- Snatch grip deadlift where you grip the bar much wider, as if doing an Olympic snatch.
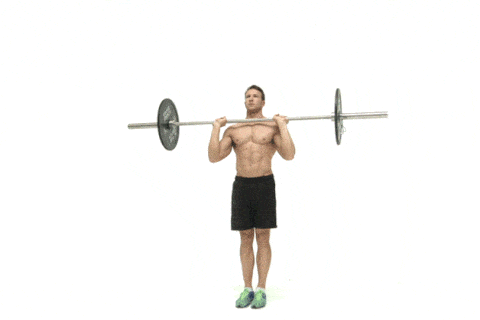
Overhead Press
 (
(- Setup
- Use a grip width such that your forearms are parallel to each other and perpendicular to the bar.
- Use either standard or false grip. A false grip helps you keep the barbell closer to the heel of your hand, minimising wrist pain.
- Unrack
- ‘Squat’ the bar out of the rack, don’t pick up the barbell.
- You can unrack from a split stance.
- You can do a 3-step walk-out like what you’d do for a squat, or take even just one economical step.
- Take a shoulder-width stance with toes pointed outwards slightly.
- Otherwise keep your heels in contact with each other for military presses.
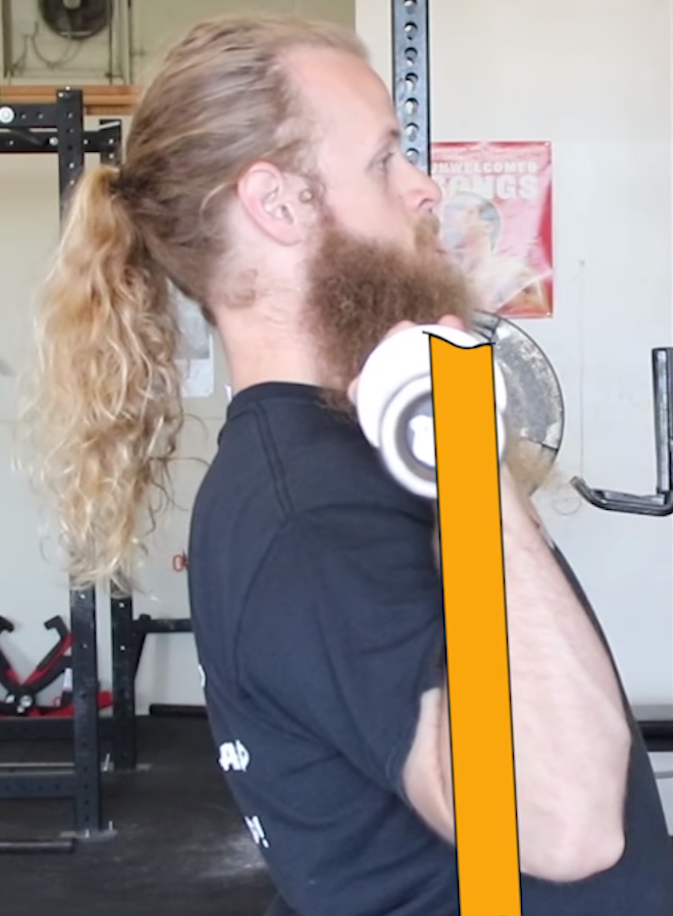
- Your triceps should ‘rest’ on your lats. Think ‘tight armpits’.
- Pre-push:
- Squeeze your glutes hard to ensure a neutral spine and prevent lower back pain.
- Brace your quads, lock your knees.
- Brace your core.
- Sink your hips forward slightly and push your head back slightly, all just before pressing the barbell. Get into a “hips→press” rhythm.
- Push out your chest up to the ceiling.
- The barbell need not rest on the collarbone if your forearms are too long.
- Keep your wrists directly above your elbows as much as possible.
- Although your elbows should protrude beyond your wrists slightly.
 (sourced from Alan Thrall)
- Although your elbows should protrude beyond your wrists slightly.
- Push:
- The barbell should travel directly up as straight as possible. This will involve dodging your chin out of the way of the barbell by tilting your head backward, then pushing your head through (like peeking your head out of a window) once the barbell is over your head.
- At the top position, the barbell should be directly above your: shoulders, hips, knees and mid-foot.
- Shrug at the top position. Cue: get the barbell as close to the ceiling as you possibly can.
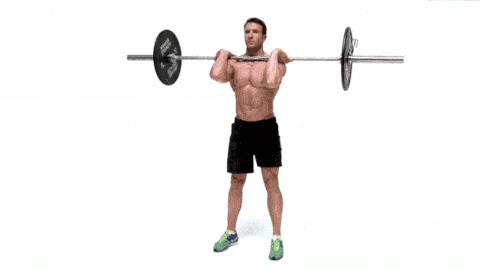
- Lower:
- Lower the barbell down to the starting position (with your elbows protruding slightly in front of the barbell and the barbell stacked firmly on your heel of your hand).
Front Squat
 (
(
Lifting Belt
- In general, prefer leather belts over suede or velcro.
- Should be wide and thick all around the belt. Powerlifting belts tend to be around 4 inches wide and 10mm or 13mm thick.
- Bodybuilding belts tend to be thinner, tapering off in thickness in the front.
- In competition, your belt must be 4 inches or less in width and 13mm or less in thickness.
In general, pick a: single-prong, 4 inch wide, 10mm thick. This works for the majority of people.
Inzer, Pioneer, SBD,
Using It
- How high you keep the belt is a matter of comfort more than anything else.
- Prefer only using the belt for heavy sets and allow yourself to naturally develop core strength over normal working sets.