NGINX is a production-grade web server that sits between the external web and your backend infrastructure. It can be configured to be a simple web server that just serves static content, or it can be used in more sophisticated architectures as a load balancer, reverse proxy, HTTP cache, and other roles. An alternative to Nginx is Apache HTTP Server.
This page assumes that NGINX is installed on a Linux machine.
Directives
Nginx configuration files contain a custom language consisting of directives. See the list of all directives. Directives can reference variables. See the list of all variables.
The primary Nginx configuration file is available at /etc/nginx/nginx.conf.
Example nginx.conf
Multiple server blocks mean you’re hosting multiple services (websites, for example).
http {
    # Serving content for a static website, my-web-app.com
    # Listens on port 80 (by default).
    server {
        server_name my-web-app.com www.my-web-app.com
        root /home/tim/my-web-app/build;
        index index.html

        location / {
            try_files $uri /index.html
        }
    }

    # Serving an API with the URL, my-api.com. Here, Nginx reverse proxies
    # requests by sending it to the process listening at port 3000 on the
    # same machine, then responds to the client with the response.
    server {
        server_name my-api.com www.my-api.com

        location / {
            proxy_pass http://localhost:3000;
        }
    }
}
Nginx config files should exist under /etc/nginx/sites-available or /etc/nginx/sites-enabled.
NGINX Architecture
Notes taken from the official blog on Nginx’s architecture.
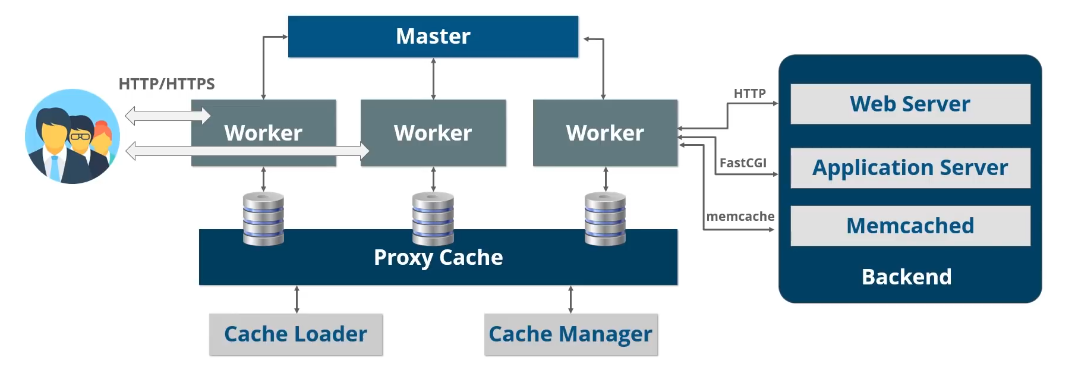
Nginx follows an event-driven master-slave architecture. Running Nginx involves spawning a master process and worker processes (which you can see via ps -ax | grep -i nginx). Nginx also manages a set of caches which it will check before actually sending the request through to the backend infrastructure.

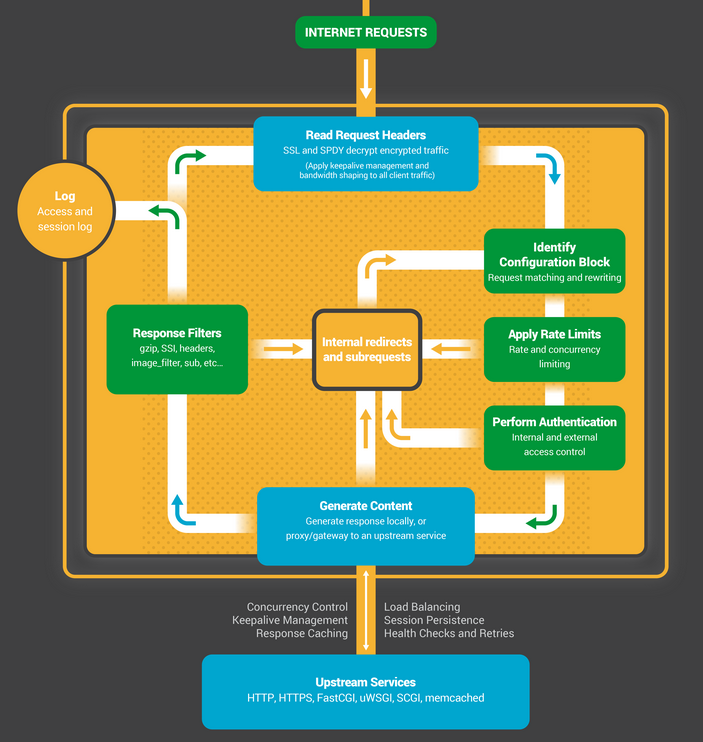
The worker processes are responsible for listening to and establishing new connections, and handling requests by talking to the upstream services in the backend infrastructure (eg. your API server). Ever worker process is single-threaded which reduces context switching on the CPU. This is an important design decision because a multi-threaded process at very high traffic would cause so much constant context switching that it seriously degrades performance. Allocating one worker process per CPU core is the most resource-efficient configuration and can be done through the directive: worker_processes auto;.
The worker processes implement the following state machine:

NGINX CLI
Nginx installations ship with a simple nginx CLI that lets you send signals the the nginx master and worker processes. I mainly find these commands useful:
nginx -t         # Checks whether NGINX configuration files are valid.
nginx -s reload  # Restart NGINX for updates to any configuration files to take effect.
LetsEncrypt
Let’s Encrypt is a non-profit Certificate Authority, trusted by most major browsers, that provides digital certificates for free! It relies on donations/sponsorships. Essentially, it makes SSL certificates available to everyone for free.
Using the certbot CLI, you can provision or renew SSL certificates and have them automatically write in the nginx configuration for you:
sudo certbot --nginx -d example.com -d www.example.comNote: make sure you:
- Have ownership over the domain
example.com. - Created DNS records that point
example.comandwww.example.comto the nginx server’s host machine’s IP address. - Have a
serverblock in your nginx config files that specifyserver_name example.com www.example.combecause that is what certbot uses to find the configuration file to write to.
You can see the SSL certificate stored at the path /etc/letsencrypt/live/.... There’ll be these files:
cert.pem— the actual SSL certificate.privkey.pem— the private key used to decrypt messages received by your server that are encrypted with the public key.fullchain.pem— concatenatedcert.pemand other intermediate certificates.
Use the following command to dump the contents of the SSL certificate.
sudo openssl x509 -in /etc/letsencrypt/live/.../cert.pem -text -noout